Sticky logo
 Search

The light turned green at a T-intersection as I eased the clutch into the friction zone and gave a final quick look to the right, the only spot where I expected to see a motorist. A sudden movement on the left stunned me; it was a Buick grille speeding toward me at a 45-degree angle from the opposite lane like a heat-seeking missile. In less than the blink of an eye, I tried to conjure up some evasive maneuver, but the car was already on me…. I remember feeling my head shift in my helmet when it slammed something hard. I felt weightless and then hit the ground with a body slam to the asphalt. I opened my eyes as I was sliding on the road and remember thinking that I was, thankfully, still alive.
The details of a guy trying to beat a light and making a left turn on a red arrow are a topic for another story, but his words to the police stuck in my mind: “I never saw him.” Luckily, I survived this initiation to Los Angeles traffic with relatively minor injuries, but I learned the words, “I never saw him,” are a far too frequent refrain in motorcyclist collisions. (Some sources quote 70% of car v. motorcycle tangles are caused by drivers turning left in front of bikes.) I also learned another word: Conspicuity.
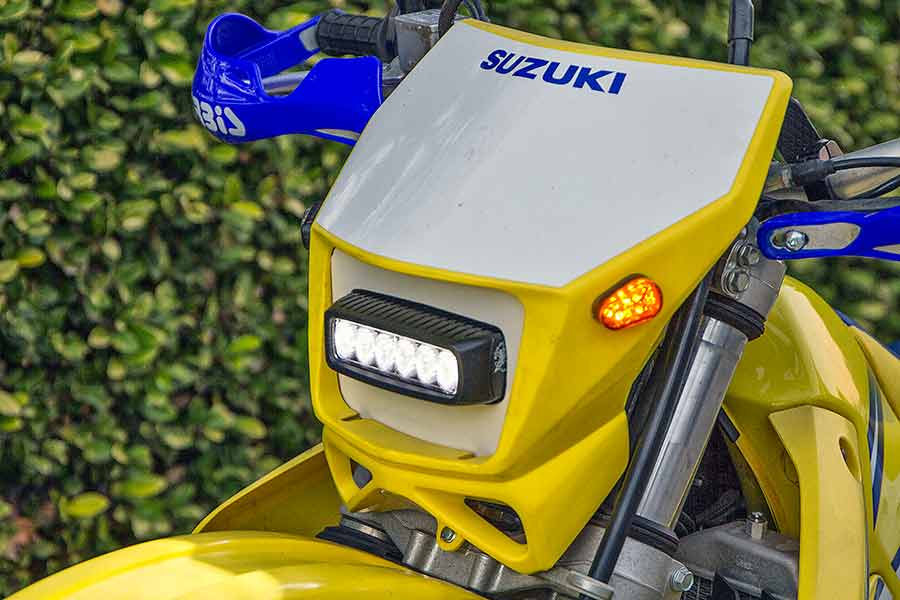 A completed installation of the SR-Q2 LED from Rigid Industries.
But let’s step back a bit and talk about accessory lights from the beginning. The iconic image of a true adventure bike is a high-standing, pannier-clad, knobbie-attired moto with a pair of accessory lights hanging off the crash bars. Those accessory lights are frequently imagined as needed for extra candlepower when high speed off-roading at night in every rider’s Walter Mittyesque vision of competing in the Baja 1000. But, there are other, more realistic, reasons for the accessory lights:
- Off-roading after dark
- Dimly lit back roads
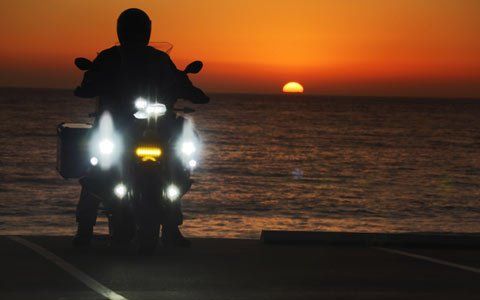
- Making yourself more conspicuous to oncoming traffic, that is, conspicuity.
Although few would consciously decide to go off-roading at night in unfamiliar terrain, it is not uncommon to underestimate the time required to get to camp and arrive well after sunset. Having extra lights can make the difference between making it back successfully or hitting a hole that bounces you off the bike. Even paved rural roads can be blindingly dark when white lines are worn off or missing. In wooded areas, the cliché of a deer in the headlights is no joke. Having a couple hundred extra feet of vision to stop can be a life or death matter. It is also a truth of physiology that as we age, night vision deteriorates. Given that there are so many ADV riders considerably past 50... well, you get the idea.
Finally, the science of conspicuity: Most motorcycles come equipped with a single headlight. Some studies claim that depth perception doesn’t work well with a single point; double it and we can better judge distance and speed of approach; ratchet it up to three points and our conspicuity reaches a far safer level when facing oncoming traffic.
Deciding to actually add accessory lights is the easy part. The hard part is selecting them. With a wide range of sizes, shapes, types and costs, the decisions might be even harder than selecting the bike to put them on. As recently as a couple of years ago, riders had a choice of Halogen, HID (High Intensity Discharge), and LED (Light Emitting Diode) options. Halogens are yellowish in color and have a life span of about 500 hours. HIDs were the go-to upgrade until very recently as the light output was far superior to either Halogen or the early, anemic LEDs. The downside to HIDs is the need for a space-robbing transformer module, a relatively short bulb life of about 2,000 hours, and a considerable power drain. The amperage draw from these HID lights would frequently mandate upgrading motorcycle stators for more power.
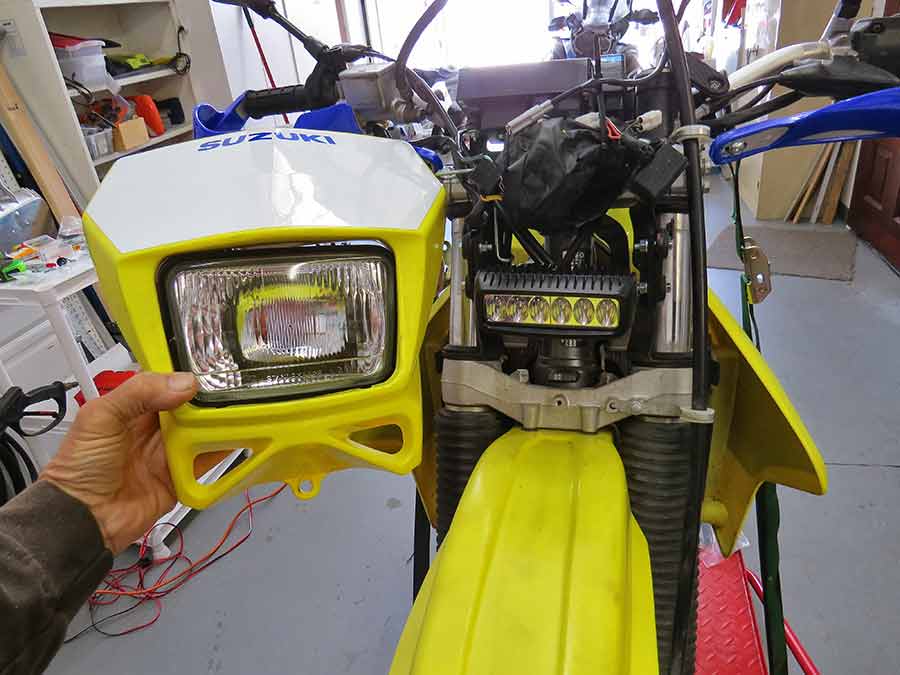 The SR-Q2 next to the stock halogen lens.
Recent developments in LEDs and lens optics have rendered HIDs and Halogen bulbs nearly obsolete. The LEDs draw far less current and provide intense, easily focused light in compact packages. However, all LEDs are not created equal. CREE is a primary supplier of LEDs, but the manufacturing process includes a process known as “binning.” In simple terms, they’re graded for color and output. High quality lights from respected manufacturers use the premium LEDs while the runts of the LED litter find their way to the cheapie imports.
In evaluating lights, you need to understand a few terms, like Lux, Lumens, and Kelvin. The color of light is measured in degrees, on the Kelvin scale. The warmer colors, like Halogen, tend to be more yellow, around 3,500°K. Sunlight is about 4,500–5,000°K. Those ice blue lights you see are typically 6,000°K or higher and are an invitation for a ticket. Most LED manufacturers recommend LEDs in the 4,500–5,000° range, which approximates sunlight and is not as fatiguing.
Lumen is the measure of light output at a specific distance from the source. You might think that simply having more Lumens is the answer, but if the light is not focused where you need it, the total Lumen value is wasted. Lux is the measurement of light intensity in a given area. As you might guess, this makes a direct comparison of lights difficult unless you have access to a laboratory of optical equipment and a budget equal to the income of a big department store at Christmas time.
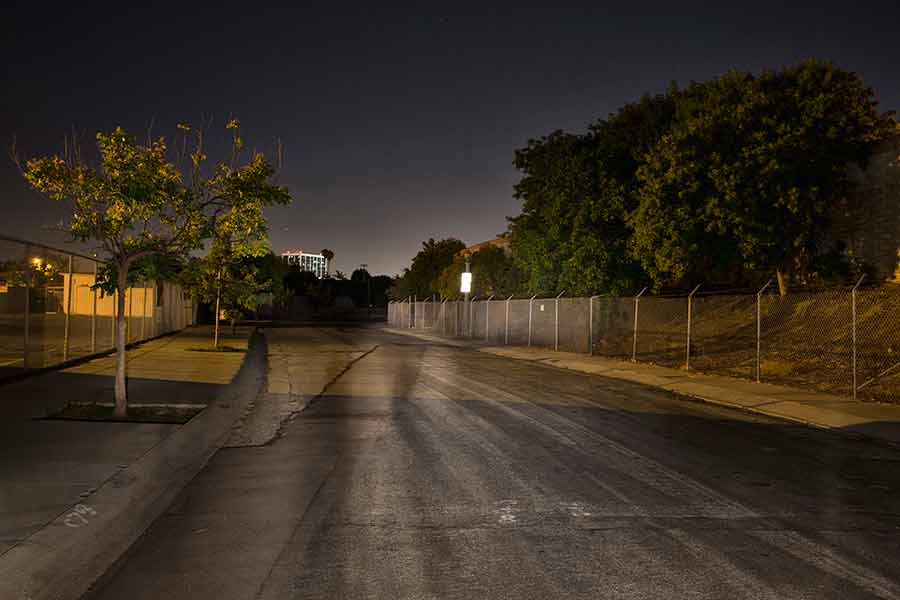 This city street looks adequately illuminated...
In the accompanying photos, we show some lights shining down a dirt trail. While each is far better than their stock headlights, however, not all differences were captured by the camera. We learned that where you ride has some influence on the pattern of light that best suits your needs. For instance, if you live in the southwest, where there is little tall vegetation, a flatter beam might help you read the terrain better. These same flat beams may not be best for use on twisty roads, since the beam will lean with the bike. In wooded areas, a cone-shaped beam will be more helpful in reading a path through the wooded areas and roadways. Fog beam or amber lenses are beneficial where you’re likely to encounter fog, dust or snow. Some lights have amber clip-on lenses; occasionally, riders will have one amber and one white light, believing this increases their conspicuity.
Once past the issues of Lux, Lumens, light color and light pattern, we get even more technical since the details are what makes the difference between a quality product and an internet low buck special. LEDs generate significant heat. Either that heat must be dissipated by some means or the level of light must be reduced to keep the LED from burning itself out. A quality unit has aluminum heat dissipating housing and a copper or aluminum bonded attachment. Lesser units have a heat sensing electronics that reduce the current and therefore lowers the heat and light output. This is not what you want when you need your lights the most.
Another issue is “dim-ability.” Lights can be bright; really bright. During the day, at full output, top drawer LEDs can be annoying to oncoming motorists, but at night they can be blinding and even put you at risk. You can turn the lights off, but then you lose the conspicuity factor. Enter the ability to dim the lights. Several manufacturers, such as Baja Designs, Twisted Throttle, Rigid Industries, and Clearwater Lights offer dimming. The ability to have the lights function at low percentage output while the main headlight low beam is on retains conspicuity. A flick of the switch to high beams results in full power.
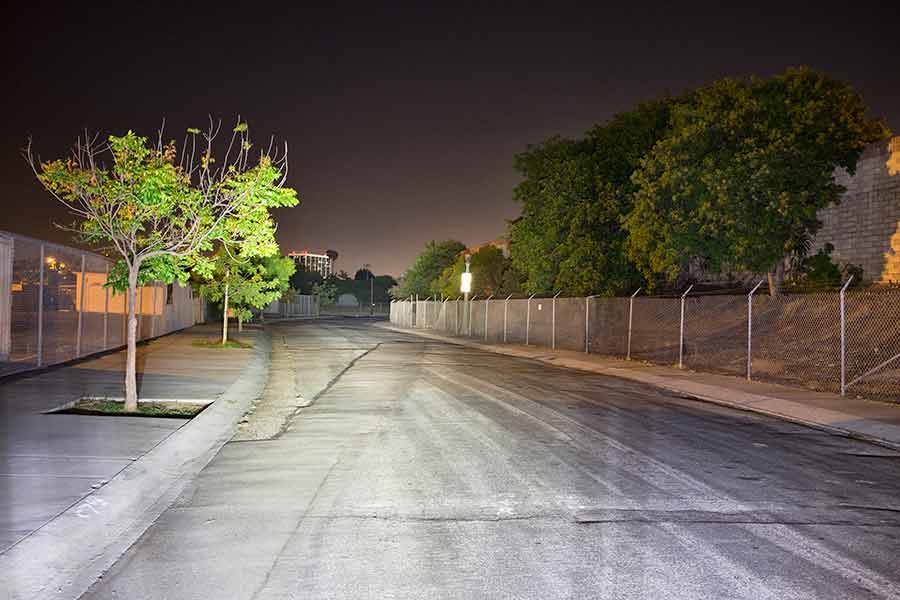 However, the difference between stock and these Squadron LED's from Baja Designs is night and day.
Fitting lights to your bike can raise other questions. Several manufacturers offer complete kits for specific bikes—mostly adventure bikes such as the BMW GS series, big KTMs, KLRs and Yamahas. These kits include specific brackets, stainless steel hardware, wiring looms and detailed instruction sheets. Generic kits are also available for mounting on crash bars. With the popularity of the big BMW R1200GS and its new challenger, the KTM 1190, more custom mounting kits are available. Black Dog Cycle Works makes a nifty set of brackets to mount a 6″ Rigid light bar between the forks. Fitting a set of lights yourself is not difficult if you have basic shop skills.
Wiring your lights requires running a wire loom connecting the battery, a switching device and the lights. The kits include a relay so that the full current draw does not go through a switch; in some cases, that switch can also function as a dimmer. For the ultimate in switching on big BMWs, Clearwater makes a premium accessory called the CANopener which allows using the existing handlebar switches to operate the accessory lights. This amazing bit of engineering was developed by hacking BMW’s ECU module and permitting the existing high beam switch to turn accessory lights off and on as well as performing other functions such as flashing the lights when you use your horn, and sending a flashing signal to accessory LED brake lights when you apply the brakes. They make complete kits, including one that mounts their smaller lights low on the forks while their main lights either replace the stock fog lights or mount to the crash bars.
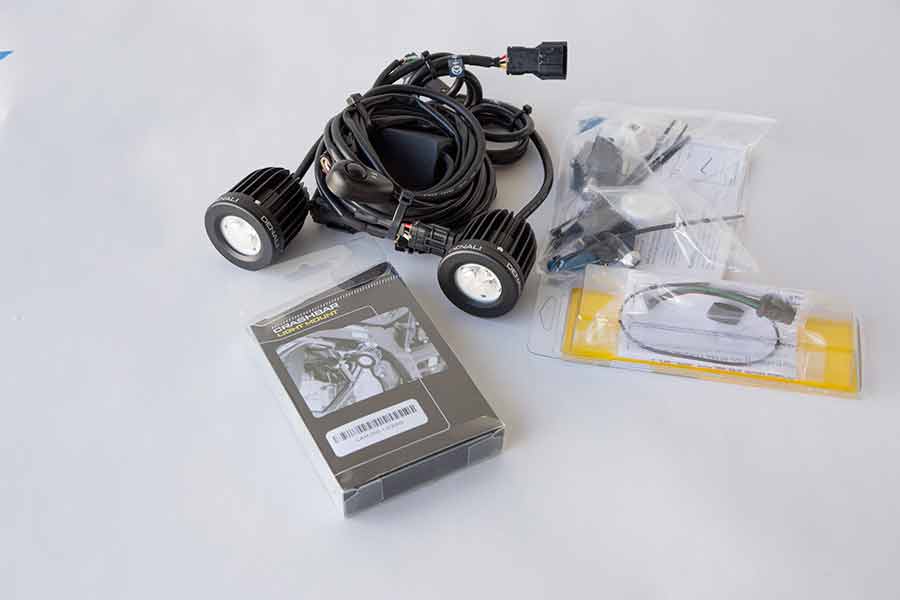 A typical LED installation includes all the necessary wiring, relays, and connectors as shown in this Denali DM kit from Twisted Throttle.
Pricing for accessory lights varies widely. A premium military spec product or advanced microprocessor-controlled dimming ability comes at a cost, but will provide longer service over the extremes encountered by ADV riders. Be sure to consider the manufacturer’s warranty before plunking down the bucks. We’ve seen many lured in by the cheap initial price of some internet no-name specials, only to replace them a few months later when they’re falling apart or water damaged.
As with almost any mod, there may be laws to consider. Local laws may vary for non-DOT approved lights, but federal law permits one set of accessory headlights on a vehicle. Use common sense; running high output LEDs set at full blast in traffic will be an invitation to discuss things with local law enforcement. On the other hand, keeping the lights on at a reasonable level is about the best thing you can do for your personal safety.
Now that we’ve covered the basics of accessory LED road lights, it’s time to “see the light” and make yourself conspicuous!
Where to Buy:
| Rigid Industries SR-Q2 LED | Baja Design Squadron LED | Denali DM |
 |
 |
 |
BajaDesigns.com | BlackDogCW.com | ClearwaterLights.com | RigidIndustries.com | TwistedThrottle.com