Sticky logo
 Search

Seat Concepts: DIY Installation
 Removing the old material is easy.We installed a Seat Concepts DIY saddle on the stock KLX seat pan to see how difficult it would be. If you’re not afraid to tackle mildly challenging jobs, then installation shouldn’t be a problem, given the right tools and time. The most important tool is a staple gun, and they’re inexpensive and handy for other projects if you don’t already own one.
 Be sure to put in enough staples!The trick to installing the seat kit is to first glue the foam to the pan, then center the cover over the foam, securing it at both ends with multiple staples. After that, you just work your way down the sides, tightening and stapling as you go. Check that your seams align to the edges of the foam from time to time and you’ll be done before you know it.
You’ll need about 90 minutes if this is your first time, but after doing it once or twice, it could easily be dropped to less than 45 minutes on simple seat pans. If none of this is up your alley, Seat Concepts also now offers versions with seat pans for a nominal fee.
Z-Carbon-It’s all Over
No one makes more bolt-on protective carbon pieces for the KLX250 than Z-Carbon from Japan. Their designs are strong, attractive, and weigh next to nothing. The folks at Zeta Racing were kind enough to send us some samples of their work, from caliper covers to hand guards, fork wraps, heel plates and shorty levers.
 Z-Carbon Frame/Heel GuardThe handguards with integrated LED signals may not be noticeable enough for commuting or riding in traffic so we left them disconnected. However, if you’re not concerned with traffic, they’re a great way to keep your bike street-legal while getting rid of the long plastic turn signal stalks that are usually the first thing to break when the bike is dropped.
Fitting Zeta Racing’s three-fingered levers behind the handguards was easy. Their pivoting levers are a definitive upgrade over stock in terms of action, adjustability and durability. Stock-length levers will also work, but having a little extra room to move fingers around behind the handguard was very welcome as was having more adjustability for smaller hands.
 Z-Carbon Caliper GuardLast, but definitely not least, are Zeta Racing’s ZCarbon bits. While simple pieces like caliper guards and fork tube wraps may seem superfluous, there’s no doubting the quality of their work once you see them. The heel guards are stronger and lighter than stock. The right-side heel cover also protects the rear brake master cylinder. The actual carbon fiber fork tube wraps not only look nice but offer serious protection against any scratches from running through brush or laying it down in the dirt. You buy crash gear hoping never to use it, but if you do, Zeta’s carbon fiber parts have you covered from caliper to caliper.
Parts List
| Product | Website | Price (USD) |
| Seat Concepts | SeatConcepts.com | $159.99 (DIY) |
| Low Saddle | $254.99 (Complete) | |
| Pro Taper Bars | ProTaper.com | $69.95 |
| Denali D2 Lamps | TwistedThrottle.com | $364.99 |
| Custom Headlight Mounts | PiperMotorsport.com | N/A |
| Zeta Z-Carbon Frame/Heel Guards | ZetaRacing.com | $101.95 |
| Zeta Z-Carbon Drive Cover | ZetaRacing.com | $59.95 |
| Zeta Z-Carbon Caliper Guard | ZetaRacing.com | $55.95 |
| Zeta Z-Carbon Fork Wraps | ZetaRacing.com | $57.95 (Upper) |
| (Upper and Lower) | $71.95 (Lower) | |
| Zeta XC Bend Handguard | ZetaRacing.com | $86.95 |
| Zeta Protectors XC | ZetaRacing.com | $21.95 |
| Zeta Pivot Levers | ZetaRacing.com | $53.95 |
| DP Brakes | DP-Brakes.com or Amazon.com | $25-$45 |
{gallery}ARTICLES/Bikes/KLX250SF_Part_II/Gallery_Images{/gallery}
Summary
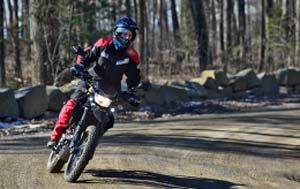
 ADVMoto's Web Editor, Amy Green, checking some traction.ADVMoto’s modified KLX250SF has been a tremendously successful project. Despite some factory bugs like lean carburetion and wonky automatic cam-chain tensioners (issues addressed by the aftermarket), the KLX250ADV has proven to be an incredibly versatile, fun and efficient ride— suitable to a wide range of situations with minor modifications. Having nine inches of adjustable suspension travel, strong braking and an estimated 32-inch saddle height (as opposed to 35 inches for the “S” model), this is one comfortable, fun and affordable mount to take around town, country or trail.
 Read: KLX250SF - Part One, Click HERE!