Sticky logo
 Search

As motorcycle overlanders and backcountry riders, one thing we need to master is the “art” of tire changing. Whether it’s fixing a flat, replacing a worn tire, or swapping it with another type, this is one skill you don’t want to leave home without.
Our two-part series focuses on in-the-field tips and tricks for getting non-motorcycle-specific tires off and on their rims—as quickly, and effortlessly as possible. Over the last three years, we’ve gathered and tested virtually everything out there. This series is an attempt to distill it all down into what we consider the most practical and workable system. Part One details tire removal, while Part Two (next issue) will discuss getting it back on the rim. We hope you’ll find this useful.

Part One: Tips on Removing thr Tires
• Optimized procedures
After the wheel is off, you’ll need a surface that is free from dirt, and firm but soft enough to not damage the wheel’s rim or disc brake(s). Starting with a drop cloth of some kind, make a simple platform with the wheel up on a rim, high enough to protect the disc brake. Do this using found objects—bricks, wood, items from your bike’s kit, a heavy set of motorcycle boots, etc. Another trick is to dig a hole big enough to recess the disc brake from surface contact.
If you’ll be remounting the same tire, use a grease marker to mark the location on the tire next to the valve stem. When the tire is remounted, use this mark to relocate this position. This trick will save you from having to rebalance. Similarly, many new tires come with a painted mark that’s intended to be located next to the valve stem.
Apparently, this mark indicates the position on the tire that has slightly less rubber to compensate for the valve stem when balancing. It doesn’t take the place of balancing, but typically requires less lead to do the job.
• Tire removal
Start by removing the valve stem core. There are special tools for this purpose, but the simplest is a valve stem cap with a coring tool built in. Deflate the tire first, then unscrew the stem’s core. Do this carefully as any remaining air pressure could accidentally eject the tiny core… a difficult object to find if you lose it.
The next task is to “break” the bead. All tires have two ringed beads that either hold the tire to the rim (tubed versions), or seal the tire against the rim (tubeless). You must “break” beads on both sides of the tire in order to remove it. Beads are REALLY stiff and difficult to work with ONLY if you don’t use proper technique. The methods we settled on use the sidestand’s foot, and/or a special tool designed for the purpose, such as the BeadBrakR.
 Using a tool like BestRest Product’s BeadBrakR makes one of the most difficult in the field tasks of breaking tire beads not just easier, but possible.
One of the most vital, yet often overlooked kit items is tire lube. Use watered-down dish soap, WD40, or preferably a substance made specifically for this purpose such as BeadGoop. Start by liberally lubing the area of the tire against the rim on the first bead. Work fast because the lube must be wet to function, apply more as necessary. Using either the foot of the sidestand, or a device like the BeadBrakR, push down on the tire about ¼″ out from the rim until it separates (this procedure requires A LOT of pressure!).
Note that separation of the bead from the rim may be impeded by tire rubber that’s partially annealed (stuck) to the rim. Just know that it will break free… it’s just a matter of working it. And, sometimes it requires a combination of methods to get the job done. The BeadBrakR is a great tool for the task—but use your motorcycle gloves for added leverage, and to insulate your hands from the hard metal edges of the lever.
The BeadBrakR kit may seem heavy and complicated, but keep in mind that it comes with three perfectly-sized tire irons (which can be substituted with Titanium versions to save weight), and all of its other components weigh less than a pound, taking up little space.
Whichever tool you use, keep pushing down on the tire until it breaks free of the rim. Then repeat about every four inches along the bead until the bead is fully separated—turn it over and do the other side. You can also use your feet to help separate the bead from the rim after it’s initially broken.
After the beads are broken, getting the tire off the rim is far less effort than many suppose. Both Grant and Dave* (see sidebar) warn that if you’re working too hard, then you’re doing something wrong. All motorcycle rims have an inner trough (groove or channel) that must be utilized for this process. The inner trough reduces the parting circumference just enough to allow the bead to clear the rim. Lube plays a vital role, too.
DO NOT USE LONG LEVERS! They only increase the chance of damaging the bead, the rim, or both. In inviolate rule is if you think you need them… you’re doing it incorrectly. The procedure is best performed with three short (~8.5″) levers, like those that come with the BeadBrakR. Again, if you’re doing this correctly, you’ll be able to remove even the heaviest big enduro tires with these tools.
 A handy trick taught by Horizon Unlimited’s Grant Johnson, is to use a BMW packing strap to keep the center stand from collapsing during a tire change. These packing straps have multiple uses and are often free for the asking from BMW motorcycle dealers.
Lube the bead area of the tire and the metal rim. With the wheel on your makeshift platform to prevent damage to the disc brake, and the valve stem furthest away from you, use your knees (motorcycle pants with knee padding work great) to push the tire’s bead immediately in front of you into the trough around the center of the wheel.
Take a single tire lever, insert it at the rim about 1″ to the right or left of the valve stem, and peel the bead away from the rim. It should come relatively easily if your knees are doing their job. Holding the first tire lever, insert another about 3″ away and repeat.
Now, you must hold both levers towards the wheel hub while you insert the third lever, and peal back more bead over the rim. It’s a bit of an awkward maneuver, but essentially, you repeat this procedure until about half of the bead is off the rim, then reach under the bead and push the wheel away, or pull the rest of tire away from the rim.
If you’ve pushed the bead into the rim’s trough with your knees, and use lube, it’ll come right off. It may take a little manhandling, but again, if the effort is too high, you’re doing something wrong. Double-check these instructions.
, plenty of tire lube and a little leverage will help to get the tire off the rim.") Knee pads (or padded riding pants), plenty of tire lube and a little leverage will help to get the tire off the rim.
Knee pads (or padded riding pants), plenty of tire lube and a little leverage will help to get the tire off the rim.
For the flipside use lots of lube around the rim and bead (it’s tricky to get it in there!), push the bead down and into the trough your knees on the opposite side of the valve stem, and with a single lever, pry the bead over the same rim as you did on the first side. Then, using the other two levers, keep working the bead away from the rim until about a third of it is off.
At this point, it’s usually easier to stand the wheel up on end, with the peeled section facing up, push the rim down with one hand while using your knee and the other hand to pull the tire away from the rest of the rim. Again, this requires a little manhandling, but if you’ve pushed the bead sufficiently into the trough of the rim, and use lube, it’ll be much easier. The knee pads of your riding gear are a great help, too.
With the tire off the rim, inspect the rim for damage and/or a buildup of annealed rubber. If there’s rubber stuck to it, it’s a good idea to take the emery cloth and polish it off. Also, if it’s a tubed rim, it’ll have some kind of rubberized strap around the center trough. If this is damaged you’ll have to repair or replace it.
 Using the side stand to break the bead often does the job. It certainly has the leverage. But if you don’t have a center stand to balance the bike on, the maneuver can be difficult, if not impossible, to pull off.
• Tire-Changing Kit (the Basics)
Tire pressure gauge—most are junk, spend the money for a good one. Recommendation: EZ Air Gauge by BestRest Products.
Tire pump (manual or electric)—electric is more convenient and easier to use. Recommendation: CyclePump Adventure Model by BestRest Products.
Tire irons (set of three)—consider the Titanium option for weight reduction. Recommendation: The BeadBrakR kit from BestRest Products, comes with three tire irons.
Lube—it’s easy to destroy a tire without lube, and the process is virtually impossible without it. Recommendation: BeadGoop from BestRest Products. You may also use WD40 or watered down liquid soap.
Valve stem removal tool—there are valve stem caps that double as removal tools.
Donor hose—the brilliant invention of Dave Petersen (described in this article) from BestRest Products.
Talcum powder—necessary for puncture-free tube insertions.
Dyna Beads—a way around complex tire balancing methods with lead weights.
Grease marker—for marking tires.
• Optional Kit
Bead breaking tool—often a side stand will do the job, but it can be awkward. Recommendation: BeadBrakR by BestRest Products.
Tire bead setting tool—for stiff tires, especially tubeless, that aren’t cooperative. Recommendation: BeadSetR by BestRest Products. This modified ratchet set has multiple other uses.
High capacity CO2 canister inflator—another trick for seating the bead, but expensive to use. Recommendation: Genuine Innovations (Touratech-USA.com).
Changing mat—alternatively you can use your riding jacket or a towel. Recommendation: Changing Mat by TrailMaster Adventures (BlackDogCW.com).
Emery cloth—for cleaning rubber and debris from a rim.
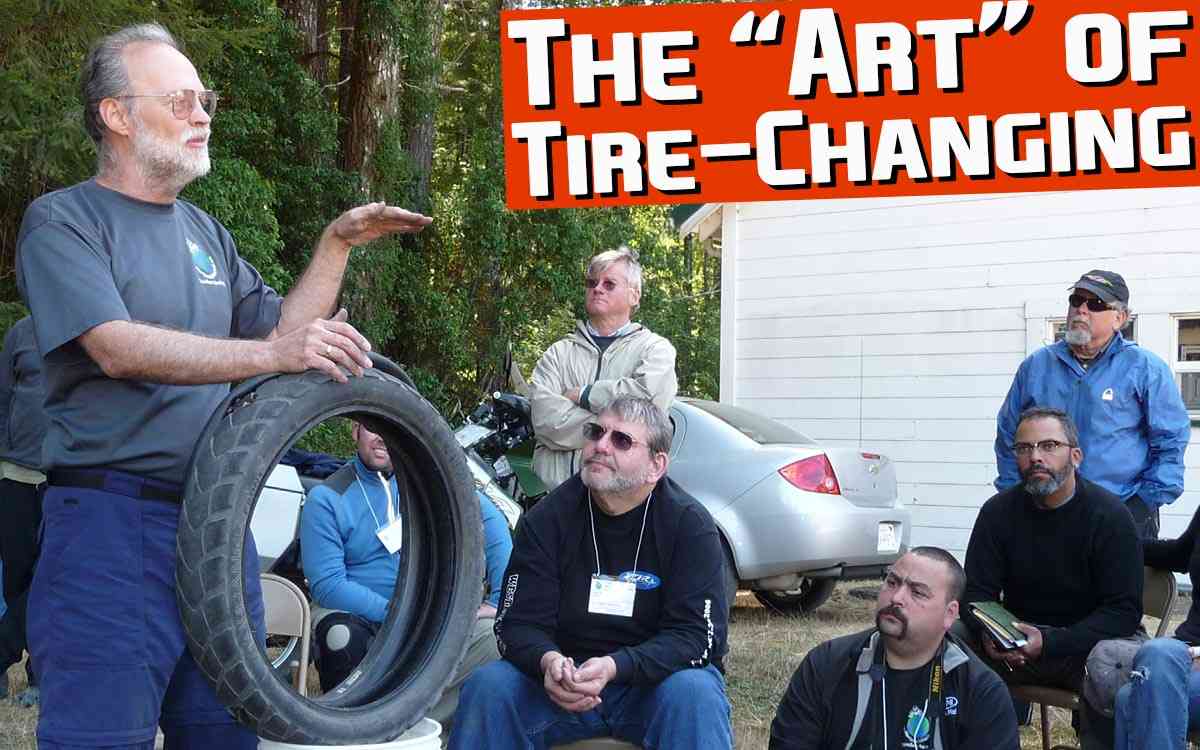
• The Gurus of Tire-Changing
Easily one of the key resources for tire-changing tools and information is BestRest Products. Dave Petersen, the company’s head honcho, seems to have devoted his life to the task. He’s invented and/or amassed a collection of tire changing methods and repair tools optimized for in-the-field repair. With few exceptions, we found that Dave’s tools made the tasks easier. Another other key resource is Grant Johnson, of Horizons Unlimited fame. Grant is not only the co-founder of HU, but may also be the best educator of resourceful tire changing techniques in the field.
Part Two: Getting the Tires Back on the Rim
In Part One we covered the best practices for removing a tire in the field. This installment discusses getting tires and tubes back on the rim. Whether it’s fixing a flat, replacing a worn tire, or swapping it with another type, these are skills you’re going to need when riding the roads of the world.
• Replacing the tire
Keep this in mind when replacing a tire—almost all tires have a directional indicator, find it and make sure that you’re mounting the tire onto the rim in the direction of forward rotation. If you’re remounting the same time, use the grease marker indication (see Part One) to locate it at the valve stem where it was originally. If it’s a new tire, look for a painted spot on the bead, usually white, red or yellow. This spot indicates where the tire manufacturer wants the valve stem to aid in the optimized balancing of the wheel.
Using a generous amount of tire lube around both the metal rim and the bead of one side of the tire, position the tire over the rim (noting correct rotation) and the location of the valve stem. The rim should be up on the makeshift platform, as indicated in the removal instructions. Using your knees and hand pressure, push a section of the tire over the rim.
 Tire rubber often sticks to the rim, making a less than optimum surface for setting the bead. It can be cleaned with a piece of emery cloth.Then, with your knees forcing that section into the trough, use your hands (sometimes a foot is necessary) to slip the remaining section of the bead over the rim. Depending on the stiffness and weight of the tire, this procedure usually requires a little manhandling, but is relatively easy to do. You may also use tire irons if necessary.
Got tube? If you’re working with a tubed tire, this is when it’ll be inserted into the tire. We recommend that you partially inflate the tube, before it’s inserted, and liberally rub talcum powder completely over its surfaces. Then, deflate it, work the valve stem through its hole in the rim, and loosely place a locking nut to hold it in place—about a half an inch from the rim. Work the remainder of the tube into the tire.
The talc allows the tube to more easily “float” against the rubber of the tire, and helps to prevent binding—which can result in a pinch that’ll puncture it during the remounting process. Once the tube is fully inserted, check the valve stem so that it is centered through the rim’s hole (you may have to shift the tire over the rim to reposition the stem), and verify that the valve moves easily up and down through the hole. If it doesn’t, it’s binding somewhere, recheck your work. But, do not tighten the nut, yet.
Lube both the remaining rim and tire bead. With the tire still on the blocks, and identical to the removal procedure, with the valve stem furthest away from you, use the levers to pry the bead over the rim nearest you. With about a third of the bead over the rim, use your knees again to push the bead into the rim’s trough. With a little more manhandling, you’ll now be able to lever the remaining bead, working it up towards the valve stem where a final pry (and lube!) will get you there.
Pay special attention to how the levers feel, because you don’t want to pinch the inner tube. This will damage the tube and necessitate a repair, i.e. starting ALL OVER again. So, be careful of that tube! The talc really does make it easier. After the beads are over the rims, you may need to shimmy the tire back and forth along the rim a wee bit to center the valve stem if you’re working with a tubed tire.
For tubed tires, lock the valve stem nut after the bead is set, not before. The valve stem itself can be tricky, so pay particular attention to it being straight, and make sure that it moves easily back and forth within the exit hole of the rim. If it doesn’t, it’s binding somewhere, so address this before continuing.
 When feeding a tube back into its tire, start by inserting the valve stem. Screw the locking nut on so that it barely clears the top of the stem. The valve stem should move easily up and down within its exit point on the rim. The nut will be tightened down at a later step in this process.
Now for perhaps the most difficult part of the entire procedure—“seating” the beads. Both tubed and tubeless wheels have grooves around the outer rims to which the tire’s beads must be seated against. In the case of tubeless tires, this creates an airtight seal.
There’s a very distinct and loud DOUBLE POPPING-PING! sound that occurs when the air pressure is increased to a point where both beads seat correctly. The trick is that if any of the conditions necessary for the setting the beads are not met, then you’ll not hear those distinct POPPING-PING! sounds.
Here are a couple more observations. After the tire is back on the rim, return it to the blocks and with heavy motorcycle boots, straddle and step onto the tire, around the rims of both sides, to flex and kneed it. This seems to make the tire more pliable and prone to easier seating. And, after you’ve done this, apply plenty of lube to both rims and the bead areas of the tire.
The next secret is getting enough air VOLUME into the tire to seat the beads. The faster you get air into the tire or tube, the more likely it is to expand against the rim and seat the beads. In a shop where you have access to an industrial air compressor, this is relatively easy to do. But, in the field, methods to create high volume air pressure require ingenuity. You can run your electric pump forever and not make this happen, and a manual pump makes this job all but impossible. So, how to do it?
Basically, there are three extremely workable methods: Using high capacity CO2 45 gram cartridges seems to be the method of choice. However, cartridges are expensive and in the field, are not readily available. Plus, it typically takes up to three canisters for big enduro back tires, such as the TKC80 on the BMW R1200GSA.
And, that’s assuming all conditions are met to seat the bead! Lots of experimenting and asking around led us to discover BestRest Product’s “DonorHose” as a truly ingenious workaround. It works by overinflating the bike’s other tire, then using a specially constructed long hose to re-inflate the tire you’re working on.
Essentially, you pump up the good wheel’s tire to 50 psi, and then use the extra pressure that this generates to quickly push air into the new/replaced tire you’re seating. In the process, you’ll often have to repeat the over inflation process at least a couple of times, especially for the big tires.
But, it will get the job done… eventually. Having an electric pump makes the process a little more palatable when using the DonorHose. Interestingly, the DonorHose itself weighs less than a single CO2 cartridge. And. we tend to favor it because it can be used infinitely.
If you cannot get the bead to seat, the final solution is a device like the BeadSetR. It’s based on the bodger technique of using a ratchet strap around the circumference of the tire to squeeze the bead against the lip of the rim. But, BestRest’s modified kit works soooooo much better than a regular ratchet strap.
By the way, don’t attempt seating the bead with the valve core in the stem. It restricts airflow too much, and won’t do the job. But, because airing up a tire in the field uses so much energy, and tends to be a slow process, you can “cheat” by holding a finger over the stem’s hole between attempts, and again before reinserting the valve’s core. It’s not a flawless technique to save air, but it’ll speed things up substantially.
If you’ve heard the DOUBLE POPPING-PING! sound, it’s likely that your tire is properly seated. Just to be sure, give it a visual check. Tire manufacturers build in a relief line that follows the rim. This line should be evenly spaced around the rim. If it’s not, try breaking the bead and reseating it. We found that when the bead wouldn’t set, that it was often necessary to break a partial seating and work the tire by pushing it down around the rim with heavy boots.
Typically, if you only hear only a single POP! Or there’s only a partial seating, you’ll cure it by adding more air. Always try adding more air (a lot of it!) before resorting to reworking the bead. This is again where familiarity plays an important role, and why practicing at home will pay big dividends.
 to more quickly and economically reinflate the tire and seat the bead on this Big GS. Read this article for more specific information on how it’s done.") One of the best airing up tricks around, Dave Petersen’s “DonorHose” utilizes air from the other tire (which has been over inflated to 50psi for this purpose) to more quickly and economically reinflate the tire and seat the bead on this Big GS. Read this article for more specific information on how it’s done.
One of the best airing up tricks around, Dave Petersen’s “DonorHose” utilizes air from the other tire (which has been over inflated to 50psi for this purpose) to more quickly and economically reinflate the tire and seat the bead on this Big GS. Read this article for more specific information on how it’s done.
• Wheel balancing
Wheel balancing may be the weakest link in the entire procedure, and we’ve not been entirely happy with any of the solutions available. The best field method seems to be Dyna Beads. But, they’re clumsy and expensive (although considered by some to be superior to lead weight balancing when installed correctly). If you carry stick-on lead weights, there’s a bodger fix of using the mounted wheel on its axle to get it, more or less, in the ballpark, but you’ll still need to find a shop to have the balancing finalized as soon as possible.
Dyna Beads, though, are somewhat of an enigma in the world of wheel balancing. A visit to the forums on the web will reveal ongoing wars as to whether they work or not. Those who’ve mastered Dyna Beads swear by them, and claim the smoothest ride they’ve ever experienced on a motorcycle. To find out more, visit BestRestProducts.com and read what Dave has to say. Installation is somewhat difficult and it’ll typically take incremental installation of the beads to find the correct amount.
Likewise, changing/repairing tires is a delicate situation when beads are involved. Technically, you can reuse the expensive beads, but it’s a real hassle. For some, lead weights may be a more workable solution, but they also require a lot of skill to install in the field.
• And… there you have it!
The ability to change tires in the field is a skill that no adventure motorcyclist can do without. It’s almost always messy, a lot of work, and difficult to do. But, when the alternatives are slim, you’ll be glad you invested the time to learn. Keep in mind that if you’re not riding solo, only one rider needs to be the tool mule. And, aside from the practical applications, you’ll save a small fortune being able to change tires on your own.
• Two “Must-Watch” Videos on Tire Changing
The Achievable Dream Series: Tire Changing
By Grant & Susan Johnson
MSRP: $24.99

Motorcycle Tire Changes & Repairs
By David Petersen
MSRP: $10.00
Special thanks to the following people and businesses for their kind assistance:
Grant Johnson, Horizons Unlimited (HorizonsUnlimited.com)
David Petersen, BestRest Products (BestRestProducts.com)
Christopher Wall, Metzeler/Pirelli (Metzeler.com)
John Leale, Vee Rubber (VeeRubberUSA.com)
Helge Pedersen, GlobeRiders (GlobeRiders.com)
Kurt & Martha Forgét, Black Dog Cycle Works (BlackDogCW.com)
Paul Guillien, Touratech (Touratech-USA.com)
JC Matsuura, Alpina Tubeless STS (AlpinaWheelsUSA.com)
Michael Battaglia, On Any Moto, Tuscon, AZ (OnAnyMoto.com)
Brandon Baldwin, Motion Pro (MotionPro.com)
Curtis Smith, Eurogeek Motosport, Flagstaff, AZ (Facebook.com/EurogeekMotosport)