Sticky logo
 Search

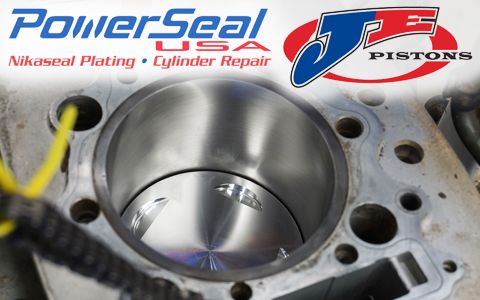
Your air-cooled Honda XR650L or XR600R engine is smoking on cold start, burning oil while riding, and doesn’t have quite the pep it used to. These engines can take a beating, but every so often they need to be freshened up. To get more power and reduce oil consumption, we’ve installed a big bore JE Piston kit after sending the cylinder to PowerSeal USA for boring and honing. For specific stepby-step instructions for disassembly and reassembly refer to your shop manual, but let’s get started demystifying the big bore kit process on an XR650L….
Disassembly
Tip: Lean the bike on its right side to let oil drain from the front left corner of the valve cover, otherwise oil will pour out.
To get the engine ready for disassembly, remove the seat, gas tank, rear brake fluid reservoir, carburetor, exhaust system and engine hanger brackets. Whenever possible, it’s advisable to stuff a lint-free rag into engine openings to avoid the time-consuming and stressful sounds of bolts plinking into the engine.
Tip: Use vice grips to pull and twist the cam chain tensioner shaft. It should only spin in one direction because of a one-way bearing in the tensioner.
Tip: Use a socket on the rotor bolt to hold the engine still when removing cam sprocket bolts.
Loosen cylinder head and cylinder bolts in a crossing pattern and in small increments until they’re fully loose. Use a rubber mallet to tap around the cylinder head and cylinder to loosen them. Be mindful of the fragile cooling fins.
After you’ve removed the cylinder it’s a good time to check for any up and down play in your connecting rod.
 Be careful when scraping off old gasket material not to drop it in the cases and to keep from damaging sealing surfaces.
Piston
We chose a forged aluminum slug from JE Pistons. Their kit includes the piston, rings, wrist pin and clips. This piston is technically an XR600R piston, 102mm in diameter rated for 10.8:1 compression in that engine. The 600R engine is similar, so wrist pins are compatible, but different wrist pin height gives us a lower compression ratio in the XR650L engine—estimated somewhere between 9.5 and 10:1 compression to add a boost over stock, but still keep engine temperatures somewhat reasonable.
Bore and Hone
The two options here are to overbore and hone the cylinder, or just hone it for new rings. A shop can tell you if the cylinder is too far out of spec for just a hone, but our bike already had a 101mm piston, so we decided to go straight for an overbore to clean it up just in case.
We turned to PowerSeal USA for boring and honing our cylinder, because of their fast turnaround and because aftermarket pistons like our 102mm JE piston often require different skirt clearances than OEM specs. Besides, PowerSeal USA has been specializing in powersports cylinder repair and Nikasil plating for a long time, working with engine builders and tuners just as much as with regular customers.
You can send PowerSeal USA your cylinder and order a piston through them, or you can buy a piston separately and then ship your cylinder and new piston to them. Either way, PowerSeal USA will need the piston you’ll be using to get skirt clearances right.
PowerSeal USA used the following specs for our piston: .076mm skirt clearance for the precisely 101.944mm piston. Perfect! The JE piston ring gaps were also right within spec, so no measuring and filing required.
 This time, I installed the piston on the connecting rod, then slid the cylinder over. Another option is to install the piston in the cylinder first, then place it on the connecting rod.
Reassembly
Tip: While the head is off, it’s a good idea to lap the valves and replace valve stem seals. If your bike is burning oil on cold starts, it’s likely your valve stem seals are toast.
After checking ring end gaps, install the oil ring and rails, then the lower and upper compression rings. Piston rings with markings like “N” should face upward. Move the rings so that the end gaps are roughly three hours apart if the piston was a clock face. After carefully scraping off leftover gasket material, install one of the circlips in the piston. JE circlips are very sturdy, so be patient when installing them. Add some assembly lube to wear surfaces like the wrist pin and connecting rod (but not piston skirts) and attach the piston to the connecting rod. Use a piston ring compressor or hose clamp to slide the cylinder on. Lightly oil the piston skirts.
Install the base gasket dry with a small spread of high-temp, oil-resistant gasket sealer at both spots where the cases meet.
Oil and torque down the cylinder bolts in a crossing pattern in three to four steps and tighten both side bolts next to the cam chain tunnel. Install an oversize 102mm or 103mm head gasket, and torque the head bolts in a crossing pattern after oiling the threads.
Tip: The cam chain tensioner can be tricky to reinstall if you don’t own the Honda tool. I used vice grips and steel wire to hold the spring back, with a healthy dose of patience.
Add assembly lube to cam journal and rocker surfaces. After installing the cam cover and torqueing the bolts in a crossing pattern, turn the engine a few times to confirm it works smoothly. Check valve clearances.
Reassemble the rest of the bike and get ready to break in those new piston rings! On first startup, crack open the upper oil feed tube bolt to confirm you have oil flow to the head shortly after startup. Once you see oil flow, torque the bolt back down.
 All done! Oil consumption is eliminated, power is better, and oil no longer turns black within 50 miles.
Break-in
All kinds of theories exist on breaking in new piston rings, but the most prevailing involve acceleration and deceleration to press the rings against the cylinder wall while the hone is still fresh. The basic principle is to run the engine hard enough to force the rings against the wall, but not so hard that excessive heat causes oil to glaze on the walls, stopping the break-in process.I went on a series of 10-minute rides, allowing cool-down time between runs, with gradually increasing throttle usage. I avoided constant cruising for roughly two hours of riding, then changed the oil and filter. So far, oil has remained clean far longer and isn’t getting burned away!
Stay tuned in a future edition of ADVMoto for a full write-up on our “Ole Smokey” XR650L Project Bike. MSRP: Oversize piston $175.58 JEPistons.com | Bore/hone varies per job PowerSealUSA.com
| FASTENER | TORQUE |
| Camshaft Sprocket Bolts | 177 in-lb |
| Cylinder Bolts | 36 ft-lb |
| Cylinder Head Bolts | 26 ft-lb |
| Cylinder Head Cover 6mm | 106 in-lb |
| Cylinder Head Cover 6mm (small head) | 88 in-lb |
| Cylinder Head Cover 8mm | 17 ft-lb |
| Engine Hanger Bolts 8mm | 19 ft-lb |
| Engine Hanger Bolts 10mm | 20 ft-lb |
| Oil Tube Union Bolts | 159 in-lb |
| Oil Tube Upper Retaining Bolt | 159 in-lb |
| Oil Tube Lower Retaining Bolt | 106 in-lb |
{gallery}ARTICLES/TechTips/XR650L_BigBore_Rebuild/Gallery{/gallery}